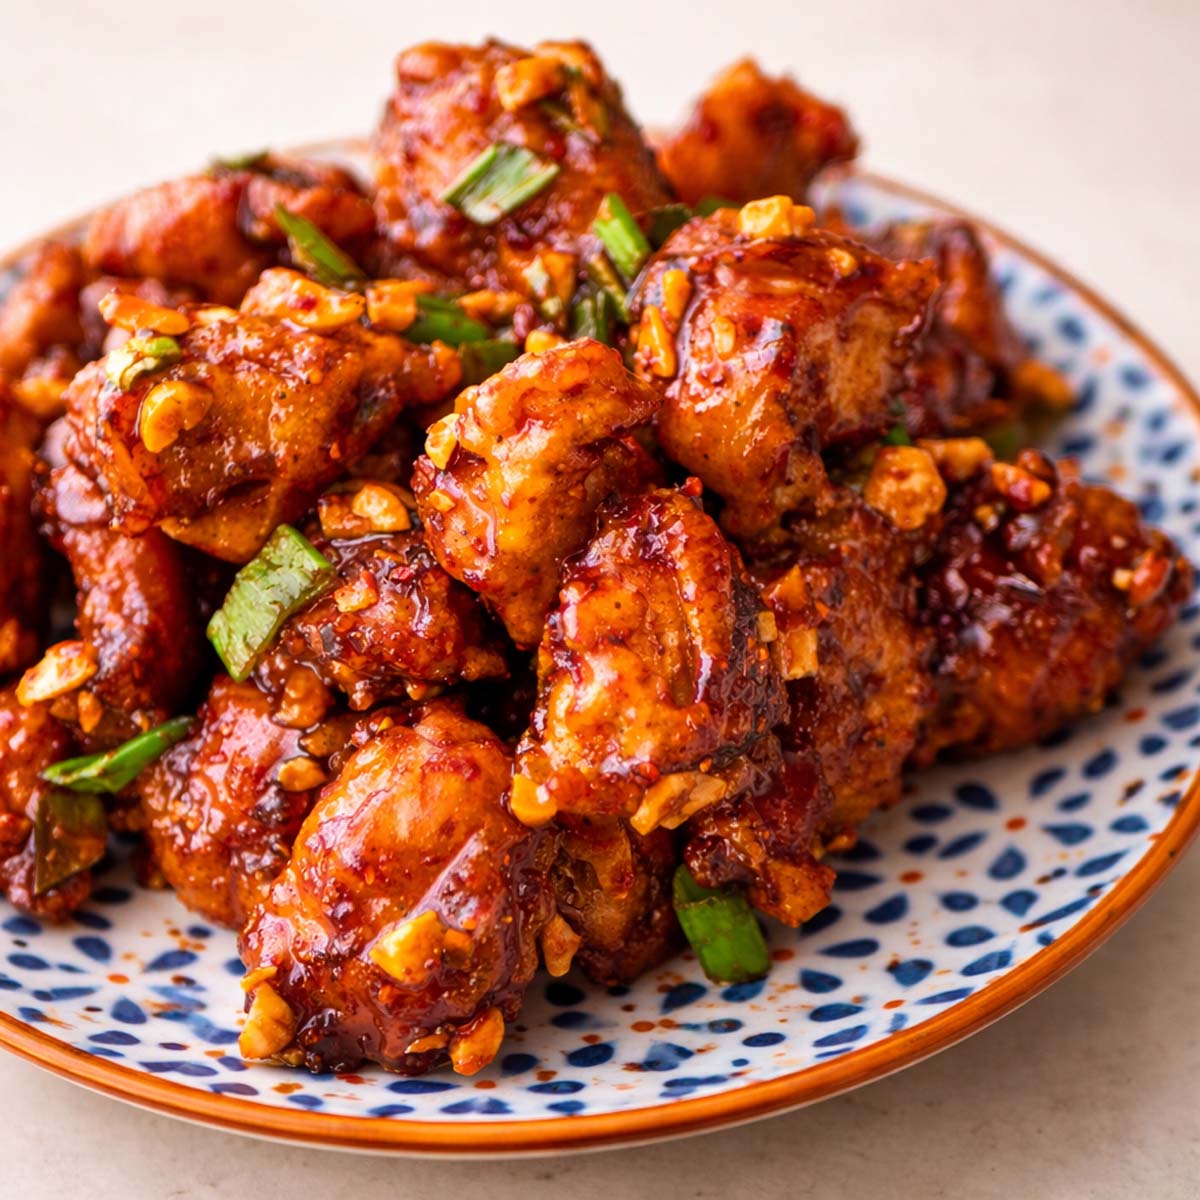
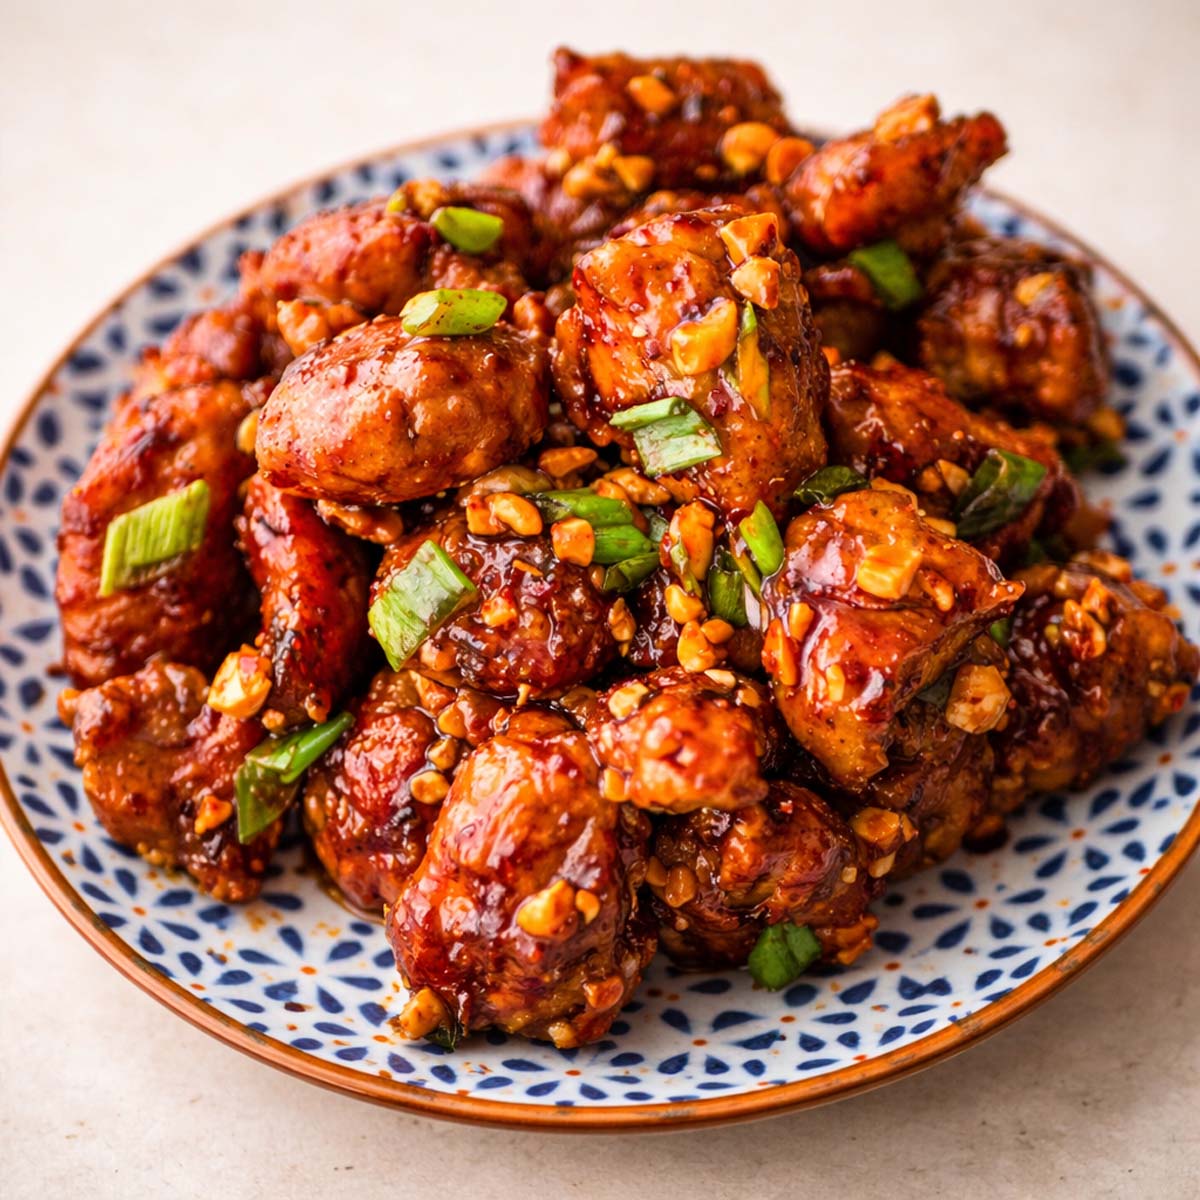
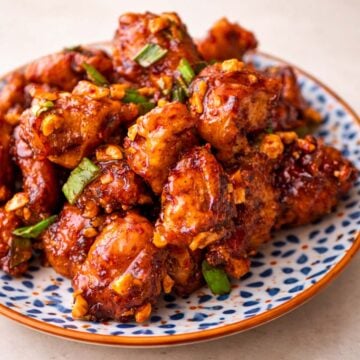
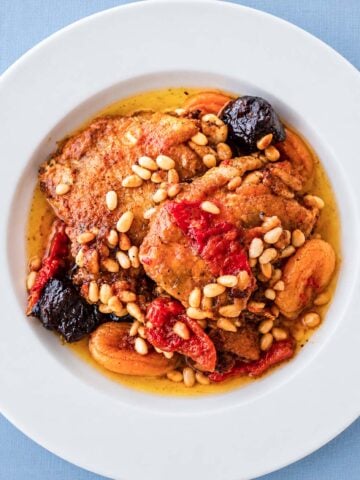
Vargasavour Recipes

  • Recipe Index
  • Desserts
  • About
menu icon
go to homepage
  • Recipe Index
  • Desserts
  • About
subscribe
search icon
Homepage link
  • Recipe Index
  • Desserts
  • About
×
Home » Recipes » Appetizers

Korean Fried Chicken

Modified: Feb 28, 2025 · Published: Feb 7, 2024 by Estefania · This post may contain affiliate links · 1 Comment

Korean Fried Chicken is truly a game-changer when it comes to flavor and texture. What sets it apart is the ultra-crispy, golden-brown coating, which is achieved through the magic of double frying. This technique ensures that each piece has the perfect crunch, while still keeping the chicken tender and juicy on the inside. Furthermore, the sweet and spicy glaze sauce takes the chicken to the next level, adding layers of bold and addictive flavor.

Recipe
Korean Fried Chicken

I first discovered Korean Fried Chicken at a restaurant in London, and I’ve been hooked ever since. Over time, it quickly became one of my all-time favorite dishes, and I now enjoy recreating it at home. What I love most is that it’s surprisingly simple to make, requiring no fancy ingredients. In fact, with just a few staples like ketchup, honey, and soy sauce, along with the technique of double frying, you can achieve that crispy, flavorful chicken you crave.

What I love most about this recipe is how customizable it is. You can adjust the spice level of the sauce to suit your taste, and you can serve it with rice, noodles, or even stuff it into bao buns for a fun twist. Whether you’re making it for a casual dinner or serving it to impress guests, Korean Fried Chicken never disappoints. It’s the perfect balance of crispy, juicy, sweet, and spicy, a must-try for any fried chicken lover! 

Korean Fried Chicken
Jump to:
  • ⭐Why You'll Love This Korean Fried Chicken
  • 🧾Korean Fried Chicken Ingredients
  • 👩🏻‍🍳How to Make Korean Fried Chicken
  • 💭Tips for Recipe Success
  • 🍗More Chicken Recipes!
  • 🍛More Appetizer Recipes!
  • 📖 Recipe
  • 💬 Comments

⭐Why You'll Love This Korean Fried Chicken

  • Easy but impressive: It may seem like a special dish, but it’s actually pretty easy to make, and I’m sure everyone will be impressed when you serve it! 
  • Crispy outside, juicy inside: The double frying makes the chicken extra crispy while keeping the inside nice and tender. It’s that perfect crunch you’ll love with every bite! 
  • Delicious sauce: The sweet and spicy sauce is so good! It’s got that perfect balance of tangy ketchup, honey, and a little kick from the chili flakes. 

🧾Korean Fried Chicken Ingredients

Here’s the breakdown of what’s in this Korean Fried Chicken recipe:

For the Chicken and Marinade:  

  • Chicken Breasts: I go for chicken breasts as they’re lean, easy to cut into bite-sized pieces, and soak up the flavors really well. You can use chicken thighs instead of chicken breasts. 
  • Salt & Black Pepper: These two are simple but essential! They bring out the natural flavor of the chicken and make sure it’s not bland. 
  • Crushed Garlic & Ginger: This combo is a must! It adds a deep, warm, slightly spicy flavor that makes the chicken taste amazing, even before frying. 
  • Lemon Juice: I love adding lemon juice as it helps tenderize the chicken and gives a little fresh tang that balances out the richness later. 

Coating:  

  • Flour & Cornstarch: Mixing these two is the secret to getting that super crispy coating.
  • Salt: A little salt in the batter ensures the crispy outside has flavor, not just the chicken inside. 
  • Water: This helps turn the dry ingredients into a batter that sticks perfectly to the chicken. 
  • Vegetable Oil: The key to deep frying! It cooks the chicken evenly and gives that golden, crunchy outside. 

For the Korean Fried Chicken Sauce:   

  • Chili Flakes & Paprika: These give the sauce a little heat and smokiness. I love how they add just the right amount of spice without being overpowering. 
  • Crushed Garlic & Ginger: Just like in the marinade, they bring a bold, punchy flavor that makes the sauce rich and full of depth. 
  • Ketchup: I use ketchup because it gives the sauce a nice tangy sweetness and helps make it thick and smooth. 
  • Soy Sauce or Worcester Sauce: This adds that deep, savory umami flavor that balances out the sweetness from the honey. 
  • Honey: I love how honey makes the sauce sticky and glossy while adding just the right amount of sweetness to counter the spice. 

Garnish: 

  • Spring Onion: It adds a fresh, slightly sharp bite that cuts through the richness of the sauce and fried chicken. 
  • Peanuts: I like throwing in some peanuts as they bring an extra crunch and a little nutty flavor that works so well with the sweet and spicy sauce. 

See the recipe card below for a full list of ingredients and measurements.

👩🏻‍🍳How to Make Korean Fried Chicken

These step-by-step instructions and photos will help you to visualize how to make this recipe. See the recipe card for a printable version of this recipe.

Process 1-4

1. Dice the chicken breasts into bite-sized pieces and marinate with salt, black pepper, crushed garlic, ginger, and lemon juice for at least 30 minutes. 

2. In a separate bowl, mix flour, corn-starch, salt, and water to create a batter, then dip the marinated chicken pieces into the batter, ensuring they are fully coated. 

3. Heat vegetable oil in a deep pan or fryer to 350°F (180°C), and fry the coated chicken pieces until golden brown and crispy. Remove the chicken, drain excess oil, and fry again for an even crispier texture. 

4. In a small bowl, mix chili flakes, paprika, garlic, ginger, ketchup, soy sauce (or Worcestershire sauce), and honey. Cook the sauce until it thickens and becomes glossy. Toss the fried chicken in the sauce and garnish with chopped peanuts and spring onions before serving.

Korean Fried Chicken

💭Tips for Recipe Success

Double fry for extra crunch: The first fry cooks the chicken, but the second fry makes it super crispy. Let the chicken rest for a few minutes after the first fry, then fry it again until golden brown. This is the secret to that perfect crunch! 

Use cornstarch in the batter: Mixing flour with cornstarch makes a huge difference. Cornstarch gives the coating that extra crispiness you want in Korean fried chicken. Just flour won’t do the trick! 

Make sure the oil is hot enough: If the oil isn’t around 350°F (180°C), the chicken will absorb too much oil and turn greasy instead of crispy. I always test by dropping a little batter in, if it sizzles and floats, it’s ready! 

Don’t drown the chicken in the sauce: I coat just enough to get that bold, sticky flavor without making the chicken soggy. Too much sauce takes away the crunch, and that’s the best part! 

Storage: Store leftover Korean fried chicken in an airtight container in the fridge for up to 3 days. Keep the sauce separate, and reheat in the oven or air fryer for the best crispiness. 

🍗More Chicken Recipes!

If you love this Korean fried chicken, you'll also enjoy these tasty chicken recipes!:

  • Chicken Teriyaki
  • Oven Baked Chicken Tenders
  • Garlic Parmesan Chicken Pasta
  • Honey Garlic Chicken Thighs
  • Baked Chicken Breast
  • Chicken Piccata
  • Avocado Chicken Salad
  • Greek Lemon Chicken Soup

🍛More Appetizer Recipes!

Here are more of my favorite appetizer recipes! Try these:

  • Egg Salad Sandwich
    Egg Salad Sandwich
  • Buffalo Chicken Dip
    Party Dip
  • Japanese Cucumber Salad
    Japanese Cucumber Salad (Sunomono)
  • Queso Dip
    Queso Dip

HUNGRY FOR MORE? Subscribe to my Newsletter and follow along on Facebook, Pinterest, and Instagram for all the latest updates.

📖 Recipe

Korean Fried Chicken

Korean Fried Chicken

Korean Fried Chicken is a deliciously crispy chicken dish, double-fried for an extra crunch, and smothered in rich, savory sauces.
5 from 2 votes
Print Rate
Course: Appetizer, Main Course
Cuisine: Asian, Korean
Prep Time: 15 minutes minutes
Cook Time: 15 minutes minutes
Total Time: 30 minutes minutes
Servings: 2
Calories: 4771
Author: Estefania
YouTube video

Ingredients 

For Chicken and Marinade:

  • 2 Chicken Breasts
  • 1 teaspoon Salt
  • ½ teaspoon Black Pepper
  • 1 ½ teaspoon Crushed Garlic and Ginger
  • Juice of ½ lemon

For Crispy Coating:

  • 50 g Flour
  • 50 g Cornstarch
  • 1 teaspoon Salt
  • 120 ml Water
  • 1 l Vegetable Oil

For Korean Fried Chicken Sauce:

  • 1 tablespoon Chili Flakes
  • 1 tablespoon Paprika
  • 1 tablespoon Crushed Garlic and Ginger
  • 1 tablespoon Ketchup
  • 1 ½ tablespoon Soy Sauce or Worcester Sauce
  • 3 ½ tablespoon Honey

For Garnish:

  • 1 Spring Onion
  • 30 g Peanuts
Prevent your screen from going dark

Instructions

  • Cut the chicken breasts into bite-sized pieces and place them in a mixing bowl.
  • Add salt, black pepper, crushed garlic, ginger, and lemon juice to the chicken pieces, mix well, and coat the chicken pieces with this marinade. Let it marinate for at least 30 minutes to allow the flavors to infuse.
  • In a separate bowl, mix flour, cornstarch, salt, and water to create a batter.
  • Place the marinated chicken pieces into the batter and mix, ensuring they are well coated.
  • Heat vegetable oil in a deep pan or fryer to around 350°F (180°C).
  • Carefully place the coated chicken pieces into the hot oil and fry until golden brown and crispy.
  • Once the chicken is cooked and crispy, remove it from the oil and drain the excess oil on paper towels.
  • Carefully place the fried chicken into the hot oil and fry again until golden brown and crispy.
  • Once the chicken is crispy, remove it from the hot oil and place it on a plate with paper towels to drain excess oil.
  • In a small mixing bowl, combine chili flakes, paprika, crushed garlic, ginger, ketchup, soy sauce (or Worcester sauce), and honey.
  • Place the sauce in a pan and cook over medium heat, stirring continuously until it thickens and becomes glossy.
  • Toss the fried chicken pieces in the prepared Korean fried chicken sauce until evenly coated.
  • Add chopped peanuts for a delightful crunch and chopped spring onion to the fried chicken for freshness and color.
  • Serve your Korean Fried Chicken immediately while it's hot and crispy. You can enjoy it as is or with a side of steamed rice.

Notes

Marinate the chicken well: Make sure you coat the chicken pieces evenly with the marinade (salt, pepper, garlic, ginger, and lemon juice) and let it sit for at least 30 minutes. The longer you let it marinate, the more flavorful it will be. 
Get the batter just right: When mixing the batter, you want it thick enough to coat the chicken but not too runny. Make sure all the chicken pieces are well coated so they fry up crispy. 
Watch the oil temperature: Heat the oil to around 350°F (180°C). If the oil's too hot, the chicken might burn before it cooks through, and if it's too cool, the chicken might become greasy. Use a thermometer to keep an eye on it if you can. 
Double frying for extra crispiness: After frying the chicken once and draining it, be sure to fry it again to get it nice and crispy. It’s the key to that perfect crunch! 
Making the sauce: When you’re cooking the sauce, keep stirring it so it doesn’t burn. You want it to thicken and become glossy without getting too thick. 
Final touches: Toss the fried chicken gently in the sauce so it doesn’t lose its crispy coating. Adding the chopped peanuts and spring onions at the end gives it that nice crunch and freshness. 

Nutrition

Calories: 4771kcal | Carbohydrates: 86g | Protein: 58g | Fat: 475g | Saturated Fat: 73g | Polyunsaturated Fat: 268g | Monounsaturated Fat: 110g | Trans Fat: 3g | Cholesterol: 145mg | Sodium: 3491mg | Potassium: 1271mg | Fiber: 6g | Sugar: 33g | Vitamin A: 3080IU | Vitamin C: 8mg | Calcium: 89mg | Iron: 5mg

Nutritional information is based on third-party calculations and should be considered an estimate only. Actual nutritional content will vary based upon brands used, measuring methods, cooking method, portion sizes, and more.

Tried this recipe? Show me on InstagramMention @vargasavourrecipes!

More Appetizers

  • BLT Dip
    BLT Dip
  • Cucumber Chicken Salad
    Cucumber Chicken Salad
  • Beetroot Hummus
    Beet Hummus
  • Spinach Artichoke Dip
    Spinach Artichoke Dip

Comments

  1. John says

    February 27, 2024 at 11:23 am

    5 stars
    Thanks for the recipe

    Log in to Reply
5 from 2 votes (1 rating without comment)

Leave a Reply Cancel reply

You must be logged in to post a comment.

Image of Estefania

Hi, I'm Estefania!

I love to cook simple & easy recipes that are inspired by my Spanish culture and travel around the world. For simple and easy recipes with an occasional twist, you’re in the right place!

About Me

Spring Dishes

  • Ground Turkey Pasta
    Ground Turkey Pasta

  • Avocado chicken salad
    Avocado Chicken Salad

  • Chicken piccata
    Chicken Piccata

  • Baked Cod
    Baked Cod Recipe

Spring Desserts

  • Chilled lemon souffle
    Chilled Lemon Soufflé

  • Lemon Fudge
    Lemon Fudge

  • Arroz con leche rice pudding
    Arroz Con Leche (Rice Pudding)

  • Blueberry Muffin Recipe
    Blueberry Muffin Recipe

LET'S CONNECT

Footer

↑ back to top

About

  • Privacy Policy
  • Terms & Conditions

Newsletter

  • Sign Up! for emails and updates

Contact

  • Contact
  • Shop

As an Amazon Associate, I earn from qualifying purchases.

Copyright © 2025 Vargasavour Recipes

Rate This Recipe

Your vote:


A rating is required
A name is required
An email is required

Recipe Ratings without Comment

Something went wrong. Please try again.